Cydia 的 Hook 原理

CyidaSubstrate 的核心功能就是提供了一个强大的注入功能

Cydia Substrate - Powerful Code Insertion Platform
Cydia Substrate 源代码注释

其中提供了两个核心的 Hook 函数

  • MSHookMessageEx – 用于 hook Objective-C 方法
  • MSHookFunction – 用于 hook C 语言函数

但是还有一个上次提到的 MSHookProcess,但是这个并不是属于公开的部分,但是也是做了 hook 工作。

MSHookProcess

这个是在上一篇说明启动原理时提到的一个注入 Cyida 就是利用了这个函数在系统启动时对 launchd 进行了注入。
这里先简单说一下结论:

函数利用了一些 mach 调用,在宿主进程的空间中分配了一些内存,然后将蹦床注入。
然后开启一个新的线程,执行蹦床的相应函数,引导目标动态库的加载,完成注入。

注入蹦床

注入蹦床的核心函数就在 MSHookProcess 中,函数原型为

1
_extern bool MSHookProcess(pid_t pid, const char *library)

函数首先通过下面的代码分配了一些栈空间以及和一个 Baton 数据结构。

1
2
3
4
5
6
7
8
9
10
11
12
13
14
15
16
17
18
19
20
21
22
23
24
25
26
27
if (library[0] != '/') {
MSLog(MSLogLevelError, "MSError: require absolute path to %s", library);
return false;
}
// 这里在栈上分配内存,保证有足够的空间来容放系带结构体以及运行空间
static const size_t Stack_(8 * 1024);
size_t length(strlen(library) + 1), depth(sizeof(Baton) + length);
depth = (depth + sizeof(uintptr_t) + 1) / sizeof(uintptr_t) * sizeof(uintptr_t);
uint8_t local[depth];
Baton *baton(reinterpret_cast<Baton *>(local));
// the dyld shared cache is only shuffled once per boot, allowing us to assume no ASLR
// however, it is important that we restrict ourselves to those in cached libraries
// XXX: it would be preferable to do this in a cross-architecture way, remotely
// 这里捕捉了一些关键的函数,因为这些函数在蹦床的执行中需要用到
// 但是蹦床编写不能直接在代码中引用这些函数,所以通过系带 Baton 记录下来
// 这些函数地址一般在共享缓存在启动加载时就固定了,在其它进程中也能正确访问
// 由下面的可以看出 Baton 的结构
baton->__pthread_set_self = &__pthread_set_self;
baton->pthread_create = &pthread_create;
baton->pthread_join = &pthread_join;
baton->mach_thread_self = &mach_thread_self;
baton->thread_terminate = &thread_terminate;
baton->dlerror = &dlerror;
baton->dlsym = &dlsym;
memcpy(baton->library, library, length);

接下来就是让 Baton 结构进入到宿主进程的空间中。这里是通过 mach 的系统调用完成,因为已经越狱,我们的程序是拥有 root 权限的,所以可以给其他进程发送 mach 消息。

1
2
3
4
5
6
7
8
9
10
11
12
// 这里计算所需分配空间的大小
vm_size_t size(depth + Stack_);
// 向目标进程发出请求,获取它的 mach task
mach_port_t self(mach_task_self()), task;
_krncall(task_for_pid(self, pid, &task));
// 然后在目标进程中分配 size 大小的空间,起始地址在 stack 中
vm_address_t stack;
_krncall(vm_allocate(task, &stack, size, true));
// 计算 Baton 存放的地址
vm_address_t data(stack + Stack_);
// 将 baton 写入宿主进程空间中
_krncall(vm_write(task, data, reinterpret_cast<vm_address_t>(baton), depth));

这个时候已经将要加载的动态库信息放入了宿主空间中,然后就是让宿主去加载动态库了。这一切的实现都依赖于 mach 的进程远程调用,让这些实现成为可能。

因为程序的主线程正在执行它自己的工作,无法引导,所以这里就创建了一个新的线程,让注入的代码能跑起来,代码比较长,说明都在注释中了。

1
2
3
4
5
6
7
8
9
10
11
12
13
14
15
16
17
18
19
20
21
22
23
24
25
26
27
28
29
30
31
32
33
34
35
36
37
38
39
40
41
42
43
44
45
46
47
48
49
50
51
52
53
54
55
56
57
58
59
60
61
62
63
64
65
66
67
68
69
70
71
72
73
74
75
// 这里通过 mach 调用在宿主进程创建了一个新的线程对象
thread_act_t thread;
_krncall(thread_create(task, &thread));
// XXX: look into using thread_get_state(THREAD_STATE_FLAVOR_LIST) to look up flavor
// 这里对线程做了一些配置
thread_state_flavor_t flavor;
mach_msg_type_number_t count;
size_t push;
// 这就是我们的蹦床对象
Trampoline *trampoline;
// 我们只看 arm 的
#if defined(__arm__)
trampoline = &Trampoline_armv6_; // 这里明显是一个常量,但是在程序中找不到符号
arm_thread_state_t state;
flavor = ARM_THREAD_STATE;
count = ARM_THREAD_STATE_COUNT;
push = 0;
#elif defined(__i386__)
// for i386
#elif defined(__x86_64__)
// for x86_64
#else
#error XXX: implement
#endif
// 这里利用了一样的方式,将蹦床注入到宿主进程空间中,这里面包含了可执行代码
vm_address_t code;
_krncall(vm_allocate(task, &code, trampoline->size_, true));
_krncall(vm_write(task, code, reinterpret_cast<vm_address_t>(trampoline->data_), trampoline->size_));
_krncall(vm_protect(task, code, trampoline->size_, false, VM_PROT_READ | VM_PROT_EXECUTE));
// 在 arm 中 frame 的大小为 0
uint32_t frame[push];
if (sizeof(frame) != 0)
memset(frame, 0, sizeof(frame));
memset(&state, 0, sizeof(state));
// 这里获取线程的状态信息
mach_msg_type_number_t read(count);
_krncall(thread_get_state(thread, flavor, reinterpret_cast<thread_state_t>(&state), &read));
if (read != count) {
MSLog(MSLogLevelError, "MSError: thread_get_state(%d) == %d", count, read);
return false;
}
// this code is very similar to that found in Libc/pthread's _pthread_setup
// 这里的函数我们只看 arm 的
// 这里设置了新线程的 数据段、堆栈段、以及将 pc 设置到蹦床的入口,
#if defined(__arm__)
state.__r[0] = data;
state.__sp = stack + Stack_;
state.__pc = code + trampoline->entry_;
// ARM has two execution states: ARM (32-bit) and Thumb (16/32-bit), using different instruction sets
// for addressing, we tell using the least significant bit: off-aligned addresses are assumed to be Thumb
// however, despite the CPU interpreting this bit during branches, it stores this information in CPSR
if ((state.__pc & 0x1) != 0) {
state.__pc &= ~0x1;
state.__cpsr |= 0x20;
}
#elif defined(__i386__)
// for i386
#elif defined(__x86_64__)
// for x86_64
#else
#error XXX: implement
#endif
// 在 arm 下这个为 0
if (sizeof(frame) != 0)
_krncall(vm_write(task, stack + Stack_ - sizeof(frame), reinterpret_cast<vm_address_t>(frame), sizeof(frame)));
// 设置线程状态并且启动
_krncall(thread_set_state(thread, flavor, reinterpret_cast<thread_state_t>(&state), count));
_krncall(thread_resume(thread));

至此主要流程就已经结束了,剩下的则是监听这个线程是否是否消亡,保证程序执行完毕并且正确回收资源。

这个代码中依旧留下了一个疑点,即 Trampoline,这个跳板被注入到了程序中被执行,它做了什么?

跳板程序 Trampoline

之前的代码留下了一个 Trampoline_armv6_ 常量对象,而且关于这个跳板程序的文件有一下几个:

头文件的内容很少,只定义了如下数据结构

1
2
3
4
5
struct Trampoline {
const char *data_;
size_t size_;
size_t entry_;
};

包装了代码的数据以及大小、入口位置。

在 Trampoline.t.cpp 中的代码如下

1
2
3
4
5
6
7
8
9
10
11
12
13
14
15
16
17
extern "C" void Start(Baton *baton) {
// ...
// 处理初始化 self
baton->__pthread_set_self(&self);
//... 处理 self 在 arm 上的问题
// 核心 创建了一个线程执行 Routine 函数
pthread_t thread;
baton->pthread_create(&thread, NULL, &Routine, baton);
void *status;
baton->pthread_join(thread, &status);
baton->thread_terminate(port);
}

线程执行的函数如下:

1
2
3
4
5
6
7
8
9
10
11
12
13
14
15
16
17
18
19
void *Routine(void *arg) {
Baton *baton(reinterpret_cast<Baton *>(arg));
void *(*dlopen)(const char *, int);
dlset(baton, dlopen, "dlopen");
// 这里执行的程序就是在宿主进程中加载我们要注入的动态库
void *handle(dlopen(baton->library, RTLD_LAZY | RTLD_LOCAL));
if (handle == NULL) {
baton->dlerror();
return NULL;
}
int (*dlclose)(void *);
dlset(baton, dlclose, "dlclose");
dlclose(handle);
return NULL;
}

这些工作都是在宿主的进程空间中执行的,所以加载的动态库也属于宿主空间了。

至于 Trampoline_armv6_ 的生成,查看编译脚本有如下命令:

1
2
%.t.hpp: %.t.cpp trampoline.sh
./trampoline.sh $@ $*.dylib $* sed otool lipo nm ./cycc $(ios) $(mac) -o$*.dylib -- -dynamiclib $< -Iinclude -Xarch_armv6 -marm

这个脚本的动作则是将 Trampoline.t.cpp 在不同的平台上编译好后,利用 lipo 查看目标文件的架构,对于每一个架构,利用 otool + sed + nm 分析 _Start 的入口点以及可执行段的位置和大小,生成对应的常量对象写到 Trampoline.t.hpp 中。所以可以看到,DarwinInjector.cpp 中有 #include "Trampoline.t.hpp"

总结

所以,整个注入流程则是:

注入跳板 -> 远程创建线程执行跳板 -> 跳板开线程加载动态库

至此,进程注入的部分就分析的差不多了,可以看到 Mach 对程序的进程间远程调用的力量是如此强大让许多黑科技得到了实现。

MSHookFunction

这个函数实现了对 C/C++ 函数的 hook。也是 CydiaSubstrate 提供的基础功能之一。

同样这里也先放出其思路,其实也很简单:

修改函数的入口,先跳转到代替函数,对原来的函数入口做一个备份返回

函数原型

1
2
3
_extern void MSHookFunction(void *symbol, void *replace, void **result) {
return SubstrateHookFunction(NULL, symbol, replace, result);
}

由上面的代码可以看出 MSHookFunction 其实是对 SubstrateHookFunction 的包装,后者根据不同的平台有不同的实现,因为代码是跑在手机上的,所以下面只摘取了 arm 部分的实现。

1
2
3
4
5
6
7
8
static void SubstrateHookFunction(SubstrateProcessRef process, void *symbol, void *replace, void **result) {
if (MSDebug)
MSLog(MSLogLevelNotice, "SubstrateHookFunction(%p, %p, %p, %p)", process, symbol, replace, result);
if ((reinterpret_cast<uintptr_t>(symbol) & 0x1) == 0)
return SubstrateHookFunctionARM(process, symbol, replace, result);
else
return SubstrateHookFunctionThumb(process, reinterpret_cast<void *>(reinterpret_cast<uintptr_t>(symbol) & ~0x1), replace, result);
}

因为 ARM 指令有两种形式:ARM 指令和 Thumb 指令,对于不同的指令执行方式,Cyida使用了不同的 hook 方式。这里拿 ARM 指令方式的函数,即 SubstrateHookFunctionARM 来做分析。

ARM 指令注入

函数的原型如下:

1
static void SubstrateHookFunctionARM(SubstrateProcessRef process, void *symbol, void *replace, void **result)

包装调用是 process 为 NULL,内部代码中也没有使用到,symbol 则是要被 hook 的函数地址,replace 则是用于替代原函数的函数,result 则是被处理过的原函数的备份地址。具体为何如此设计,待我们分析慢慢道来。

备份指令

1
2
3
4
5
6
7
8
9
if (symbol == NULL)
return;
uint32_t *area(reinterpret_cast<uint32_t *>(symbol));
uint32_t *arm(area);
const size_t used(8); // 单位是byte,要替换的是函数的前两个指令
// 读取前两条指令作为备份
uint32_t backup[used / sizeof(uint32_t)] = {arm[0], arm[1]};

上面的函数获取了原函数的地址,并且取出了前两条 ARM 指令做为备份。

1
2
3
4
5
6
7
8
9
10
size_t length(used);
for (unsigned offset(0); offset != used / sizeof(uint32_t); ++offset)
if (A$pcrel$r(backup[offset])) { // 下面解释
if ((backup[offset] & 0x02000000) == 0 || (backup[offset] & 0x0000f000 >> 12) != (backup[offset] & 0x0000000f)) // 下面解释
length += 2 * sizeof(uint32_t); // 加两个指令长度
else
length += 4 * sizeof(uint32_t); // 加四个指令长度
}
length += 2 * sizeof(uint32_t); // 再加两个指令长度

这里是在计算替换掉的两条指令需要用多少指令来进行还原。这个 for 循环其实值执行了两次,也就是查看了一下被替换的两条指令的情况。

核心检查在 A$pcrel$r(backup[offset]) 函数,这个函数定义如下:

1
2
3
static inline bool A$pcrel$r(uint32_t ic) {
return (ic & 0x0c000000) == 0x04000000 && (ic & 0xf0000000) != 0xf0000000 && (ic & 0x000f0000) == 0x000f0000;
}

看到这估计就会慌了,这究竟是个啥?这奇怪的函数名究竟是个啥?

这里就需要查询一下 ARM 的指令手册了,因为观察了一下调用是传进来的参数,是一条 ARM 机器指令,说明这里就是一个机器指令的检查。
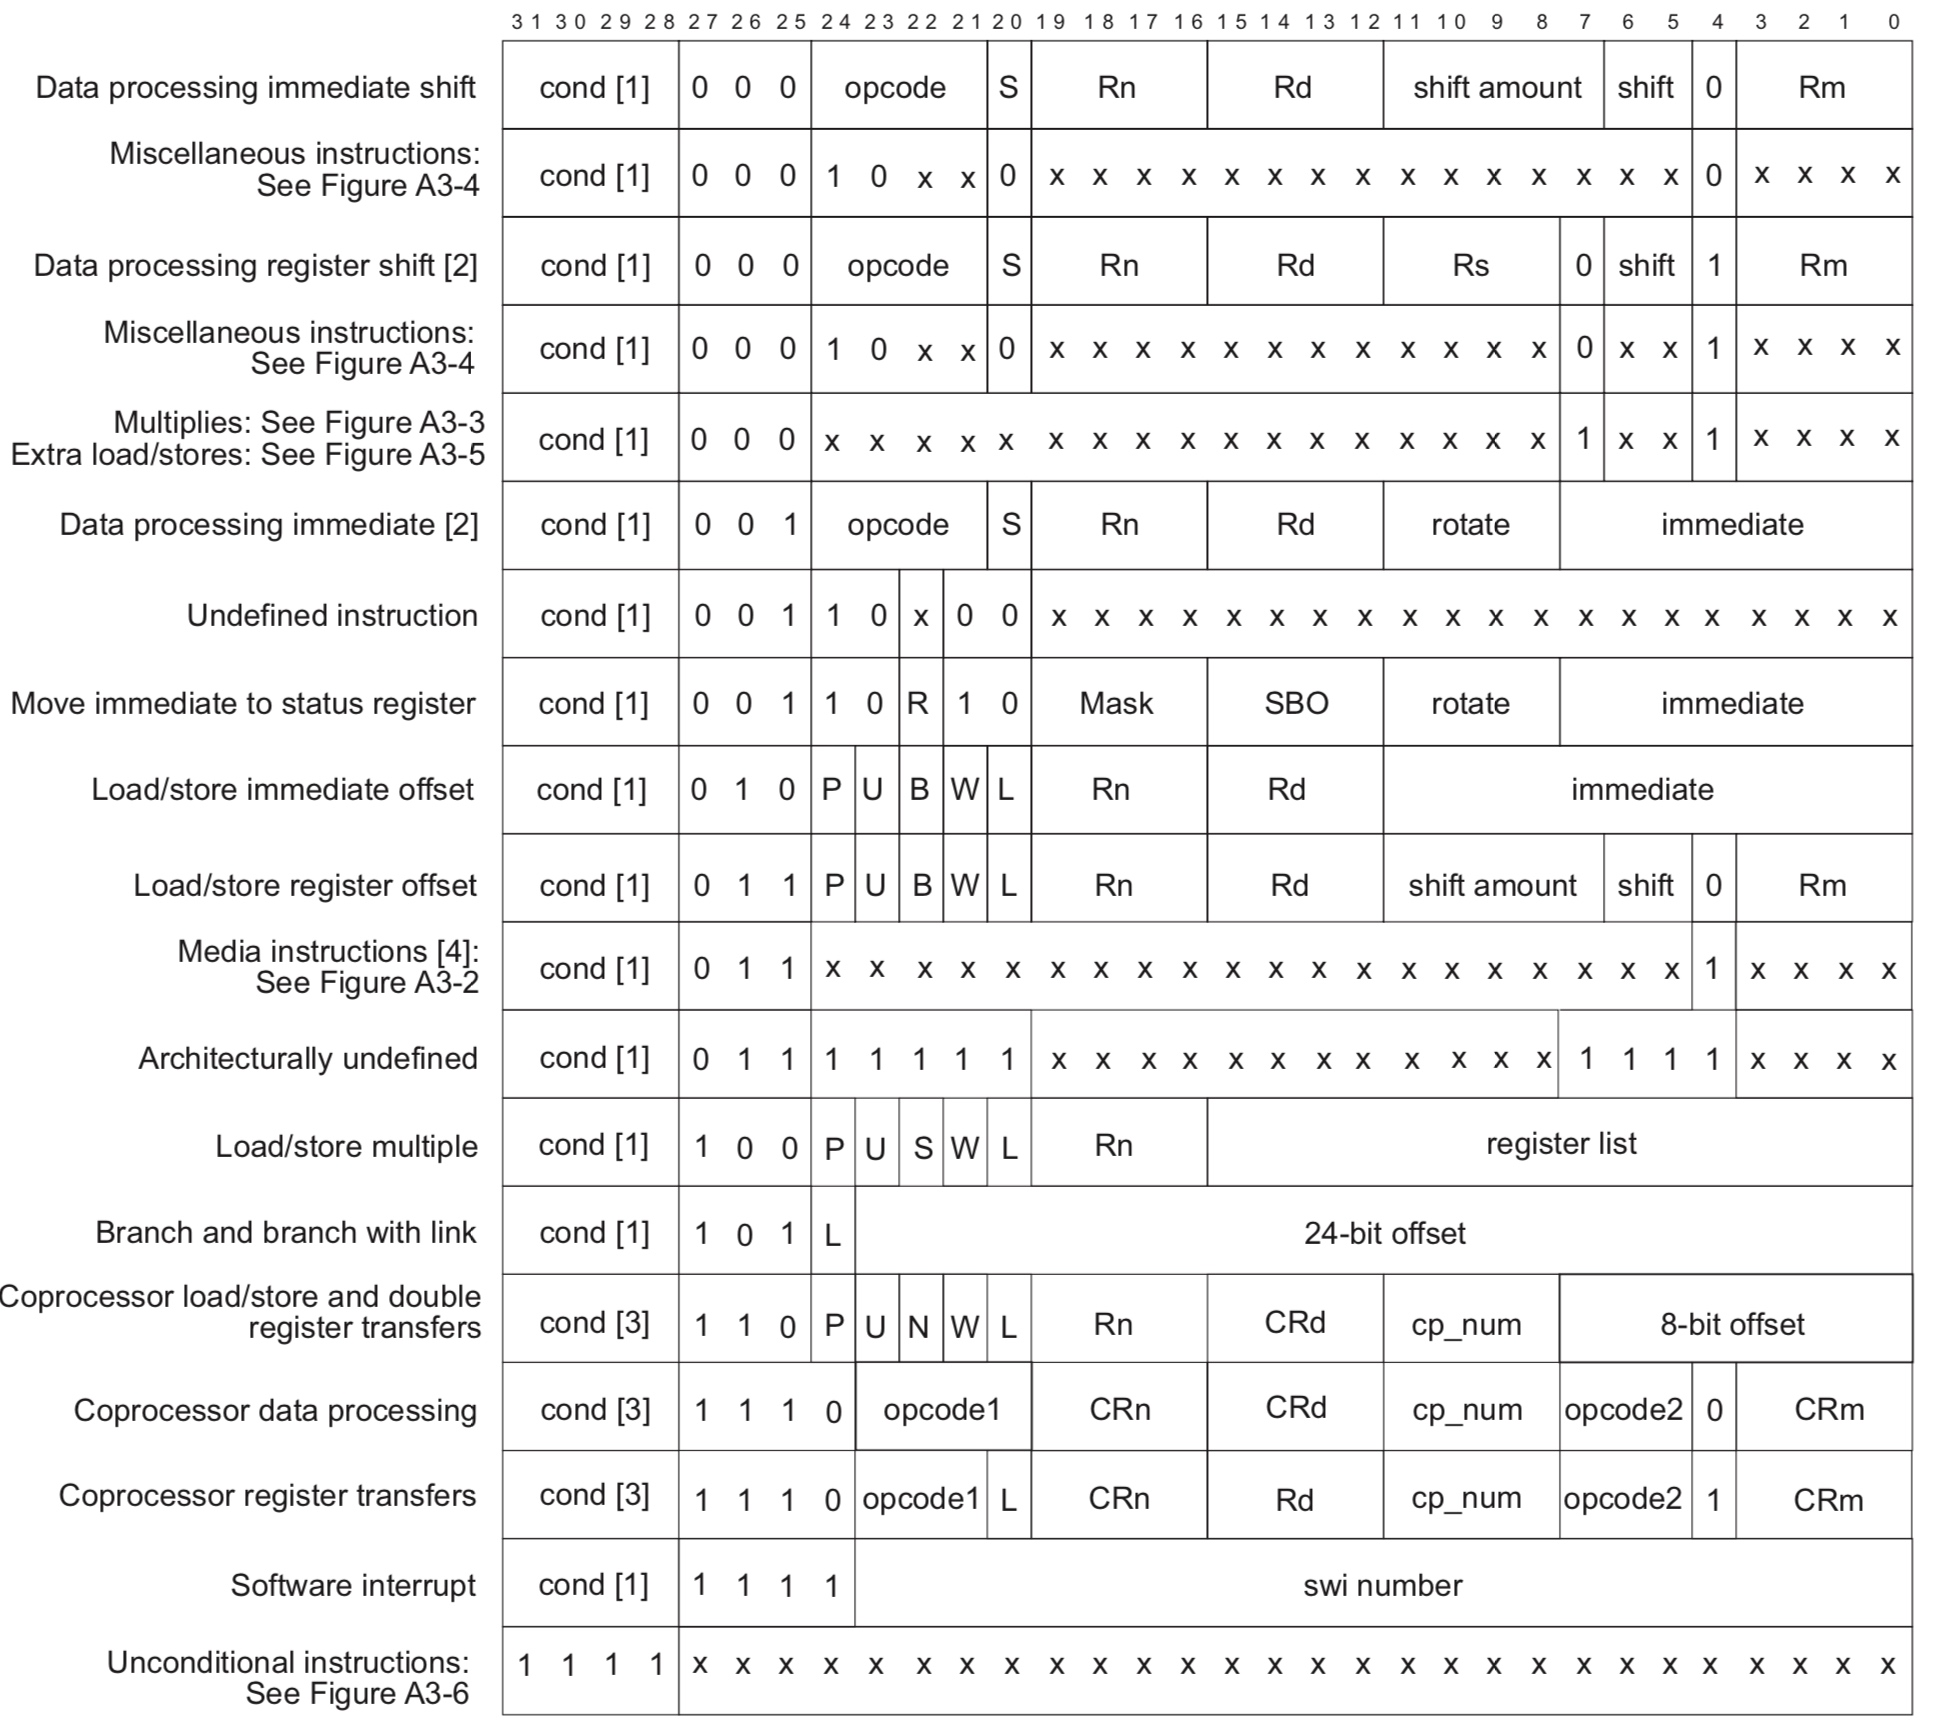
ARM 指令格式

ARM 指令都是定长的,所有指令都是 32 位,占 4 个字节的空间。下面的表展示了 ARM 指令各个为代表的内容:

现在回顾函数的做的三个判断条件:

1
2
3
(ic & 0x0c000000) == 0x04000000
&& (ic & 0xf0000000) != 0xf0000000
&& (ic & 0x000f0000) == 0x000f0000

这些都是取出了某些位然后做出的检查判断。

第一个取出了指令的第 26~27 号位,这几位表示了指令的类型,检查这几位是否是 01。说明第一个是在检查指令是否是内存的读写指令。
第二个取出了指令的第 28~31 号位,并且希望它不是全 1,看到是不希望指令为无条件的指令。
第三个取出了指令的第 16~19 号位,即 Rn,表示源操作数,并且希望它为 0b1111,即寄存器 pc

综合起来似乎就是判断这个指令是否是依赖 pc 来定位读写地址的指令。
回顾其函数名 A$pcrel$r A 就代表 ARM,中间的 pcrel 似乎就表着 pc relative。

但是为什么要做这种检查还不能太早下定论,需要进一步的探索才能了解。(当然,根据实现思路应该可以猜到是为什么了)

然后这个函数检查生效以后还有一个判断条件走不同的分支:

1
2
(backup[offset] & 0x02000000) == 0
|| (backup[offset] & 0x0000f000 >> 12) != (backup[offset] & 0x0000000f)

用和上面相同的办法进行查找,不过,因为第一个判断已经确定一个读写指令,所以可以对照读写指令的详细格式:

  • I 指示指令的寻址方式,0 为立即数寻址,1 为寄存器寻址

第一个条件取出了指令的第 25 号位,判断是否为 0
第二个条件取出了指令的第 12~15 号位,并向右移 12 为,与第 0~4 号位进行比较,即比较Rd 与 Rm 是否相同。

这个条件则在筛选相对 pc 立即数寻址,即 ldr rd, [pc, #im] 这类指令以及 ldr rd, [pc, rd] 这类指令。

这类指令只需要 2 个多余指令来做还原处理,其他的则需要 4 个指令处理。

填充指令

1
2
3
uint32_t *buffer(reinterpret_cast<uint32_t *>(mmap(
NULL, length, PROT_READ | PROT_WRITE, MAP_ANON | MAP_PRIVATE, -1, 0
)));

分配一块内存,存放新的执行代码。
接下来开始填充代码,源代码如下:(不要紧张,可以先简单阅读,找出一些关键点)

1
2
3
4
5
6
7
8
9
10
11
12
13
14
15
16
17
18
19
20
21
22
23
24
25
26
27
28
29
30
31
32
33
34
35
36
37
38
39
40
41
42
43
44
45
46
47
48
49
50
51
52
53
54
55
56
57
58
59
60
61
62
63
64
65
66
67
68
69
size_t start(0), end(length / sizeof(uint32_t)); // 单位是指令数
uint32_t *trailer(reinterpret_cast<uint32_t *>(buffer + end)); // 这里指向了最后一条指令 + 1
for (unsigned offset(0); offset != used / sizeof(uint32_t); ++offset)
// 这里的检查与上面计算指令数的条件是一样的
if (A$pcrel$r(backup[offset])) {
union {
uint32_t value;
// 这里讲指令进行了分解,可以看到分解的情况跟之前的图是对应的
struct {
uint32_t rm : 4;
uint32_t : 1;
uint32_t shift : 2;
uint32_t shiftamount : 5;
uint32_t rd : 4;
uint32_t rn : 4;
uint32_t l : 1;
uint32_t w : 1;
uint32_t b : 1;
uint32_t u : 1;
uint32_t p : 1;
uint32_t mode : 1;
uint32_t type : 2;
uint32_t cond : 4;
};
} bits = {backup[offset+0]}, copy(bits); // 这里对原来的指令做了一次拷贝
bool guard;
// 这个地方印证了在计算指令条数时,分析判断条件的正确性
// 这里对原来的指令做出调整
if (bits.mode == 0 || bits.rd != bits.rm) {
copy.rn = bits.rd;
guard = false;
} else {
copy.rn = bits.rm != A$r0 ? A$r0 : A$r1;
guard = true;
}
// 将 copy.rn 内容压栈
if (guard)
buffer[start++] = A$stmdb_sp$_$rs$((1 << copy.rn));
// 核心的调整代码
buffer[start+0] = A$ldr_rd_$rn_im$(copy.rn, A$pc, (end-1 - (start+0)) * 4 - 8);
buffer[start+1] = copy.value;
start += 2;
// 将 copy.rn 从栈中读出来
if (guard)
buffer[start++] = A$ldmia_sp$_$rs$((1 << copy.rn));
// 将原指令地址放在尾部
*--trailer = reinterpret_cast<uint32_t>(area + offset) + 8;
end -= 1;
} else
buffer[start++] = backup[offset]; // 拷贝源指令
// 尾部的跳转指令
buffer[start+0] = A$ldr_rd_$rn_im$(A$pc, A$pc, 4 - 8);
buffer[start+1] = reinterpret_cast<uint32_t>(area + used / sizeof(uint32_t));
// 给 buffer 执行的权限
if (mprotect(buffer, length, PROT_READ | PROT_EXEC) == -1) {
MSLog(MSLogLevelError, "MS:Error:mprotect():%d", errno);
goto fail;
}
// 将修改好的源函数返回
*result = buffer;
// 最后修改目标函数的代码
{
SubstrateHookMemory code(process, symbol, used);
arm[0] = A$ldr_rd_$rn_im$(A$pc, A$pc, 4 - 8);
arm[1] = reinterpret_cast<uint32_t>(replace);
}

先忽略代码中指令调整的处理,从代码逻辑可以看出来,在最简单的情况下,这个程序对原程序作了如下图的调整:

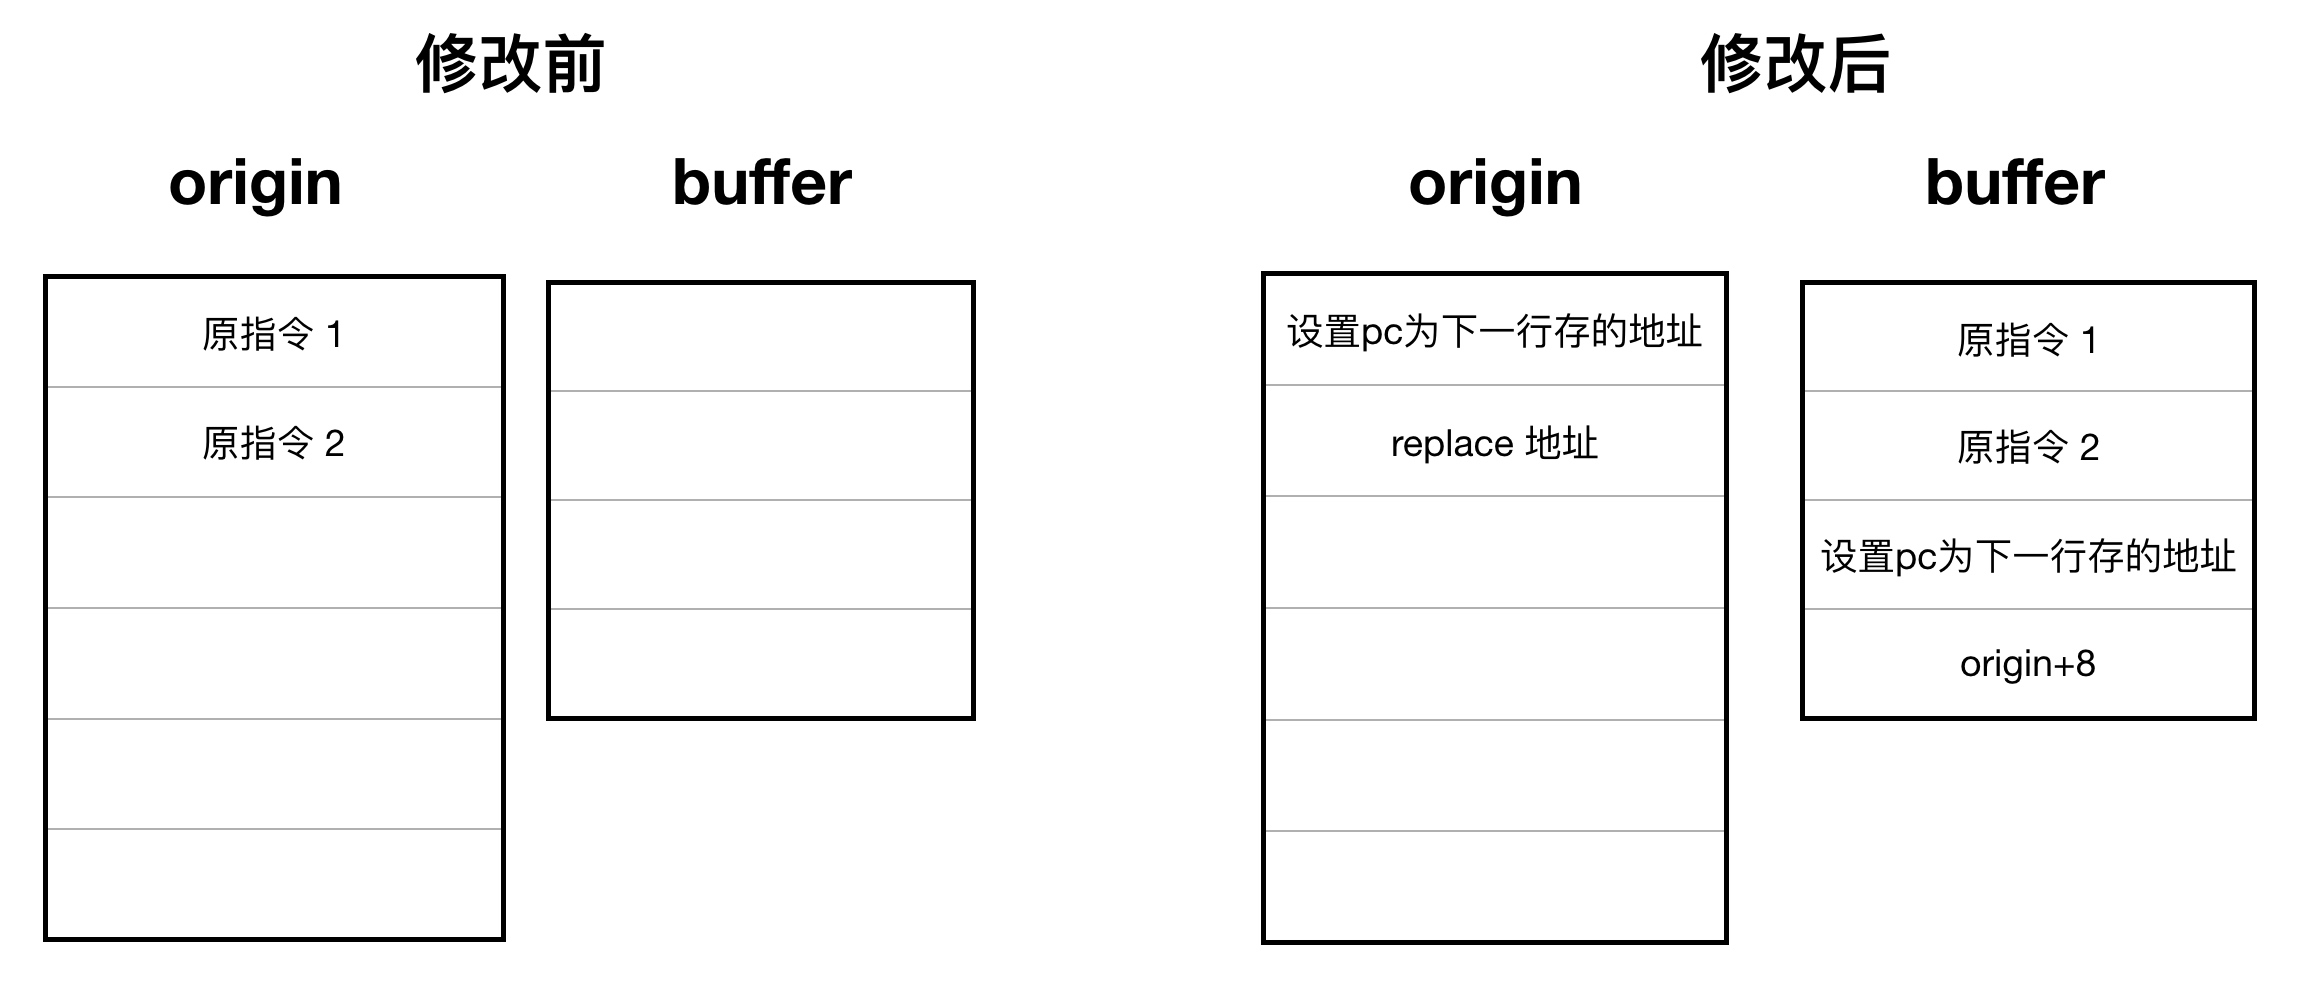
通过修改 pc 的值,就可以实现直接的跳转,如此实现的调用原函数会跳转到替代函数中,而想要调用原函数时,只需要对 buffer 进行调用,让它来帮助跳转即可,所以计算长度时最后多家的两个指令就是为了处理跳转使用。

至此,按理说 Cyida 对 C 语言的 hook 原理已经很清楚了,但是为什么还多出了这么多处理呢?

维护 pc 相对值

设想一下,如果原指令1、2都是类似 ldr rd, [pc, #im] 的指令,即读取相对于 pc 值某个偏移量的地址下的值。上图中的最简单版本会造成错误的结果。因为 buffer 的地址与 origin 的地址并不相同,所以执行到相应指令时 pc 值是不正确的。

所以,解决办法是就这一类指令进行单独的处理,恢复修改后造成的错误。

指令内容

为了不影响继续阅读,先解析一下源代码中出现的指令情况。

对于 ARM 指令,源代码中定义了很多指令在 ARM.happ 中,源代码如下:

1
2
3
4
5
6
7
8
9
10
11
12
13
14
15
16
17
18
19
20
21
22
23
24
25
26
27
28
29
30
31
32
33
34
35
36
37
38
39
40
41
// ARM.hpp
// 代表 32位 ARM 汇编的所有寄存器
enum A$r {
A$r0, A$r1, A$r2, A$r3,
A$r4, A$r5, A$r6, A$r7,
A$r8, A$r9, A$r10, A$r11,
A$r12, A$r13, A$r14, A$r15,
A$sp = A$r13,
A$lr = A$r14,
A$pc = A$r15
};
// 代表 ARM 汇编中所有的 cond 字段
enum A$c {
A$eq, A$ne, A$cs, A$cc,
A$mi, A$pl, A$vs, A$vc,
A$hi, A$ls, A$ge, A$lt,
A$gt, A$le, A$al,
A$hs = A$cs,
A$lo = A$cc
};
// 一些列构造指令的宏
#define A$mrs_rm_cpsr(rd) /* mrs rd, cpsr */ \
(0xe10f0000 | ((rd) << 12))
#define A$msr_cpsr_f_rm(rm) /* msr cpsr_f, rm */ \
(0xe128f000 | (rm))
#define A$ldr_rd_$rn_im$(rd, rn, im) /* ldr rd, [rn, #im] */ \
(0xe5100000 | ((im) < 0 ? 0 : 1 << 23) | ((rn) << 16) | ((rd) << 12) | abs(im))
#define A$str_rd_$rn_im$(rd, rn, im) /* sr rd, [rn, #im] */ \
(0xe5000000 | ((im) < 0 ? 0 : 1 << 23) | ((rn) << 16) | ((rd) << 12) | abs(im))
#define A$sub_rd_rn_$im(rd, rn, im) /* sub, rd, rn, #im */ \
(0xe2400000 | ((rn) << 16) | ((rd) << 12) | (im & 0xff))
#define A$blx_rm(rm) /* blx rm */ \
(0xe12fff30 | (rm))
#define A$mov_rd_rm(rd, rm) /* mov rd, rm */ \
(0xe1a00000 | ((rd) << 12) | (rm))
#define A$ldmia_sp$_$rs$(rs) /* ldmia sp!, {rs} */ \
(0xe8b00000 | (A$sp << 16) | (rs))
#define A$stmdb_sp$_$rs$(rs) /* stmdb sp!, {rs} */ \
(0xe9200000 | (A$sp << 16) | (rs))
#define A$stmia_sp$_$r0$ 0xe8ad0001 /* stmia sp!, {r0} */
#define A$bx_r0 0xe12fff10 /* bx r0 */

这个文件定义了 ARM 的所有寄存器 r0~r15,不过关键是在还定义了许多宏,这些宏都代表了一条 ARM 指令。

这里拿出一个宏进行分析,其他的宏构造指令的方式都是一样的:

1
2
#define A$ldr_rd_$rn_im$(rd, rn, im) /* ldr rd, [rn, #im] */ \
(0xe5100000 | ((im) < 0 ? 0 : 1 << 23) | ((rn) << 16) | ((rd) << 12) | abs(im))

对照就可分析了:

1
0xe5100000 -> 1110 010 1 0 0 0 1 0000 0000 000000000000

判断 im 是否为负,为负则将 U 置为 0 表示要减掉,1 表示为加上。然后将 rn rd 移动到对应的位置,最后的部分放置立即数。

回到之前的讨论

源代码中做的指令检查就是为了筛选出这类指令,恢复的过程摘录如下:

1
2
3
4
5
6
7
8
9
10
11
12
13
14
15
16
17
18
19
bool guard;
if (bits.mode == 0 || bits.rd != bits.rm) {
copy.rn = bits.rd;
guard = false;
} else {
copy.rn = bits.rm != A$r0 ? A$r0 : A$r1;
guard = true;
}
if (guard)
buffer[start++] = A$stmdb_sp$_$rs$((1 << copy.rn));
buffer[start+0] = A$ldr_rd_$rn_im$(copy.rn, A$pc, (end-1 - (start+0)) * 4 - 8);
buffer[start+1] = copy.value;
start += 2;
if (guard)
buffer[start++] = A$ldmia_sp$_$rs$((1 << copy.rn));
*--trailer = reinterpret_cast<uint32_t>(area + offset) + 8;
end -= 1;

这里依旧需要分成三种情况来讨论

指令为立即数偏移

指令为立即数偏移的情况来看,例如为如下指令:

1
ldr r8, [pc, #0x10]

经过上述的修改流程,可以知道 buffer 中的代码变成了如下形式:

1
2
ldr r8, [pc, #X] ; 这里 [pc, #X] 指向了buffer末尾,存储原指令的地址
ldr r8, [r8, #10]

假设只有第一行是需要特殊处理的,并且第一条形式跟现在讨论的相同,由上述推知 buffer 应该有 6 个指令长,操作过后buffer指令的形式如下:

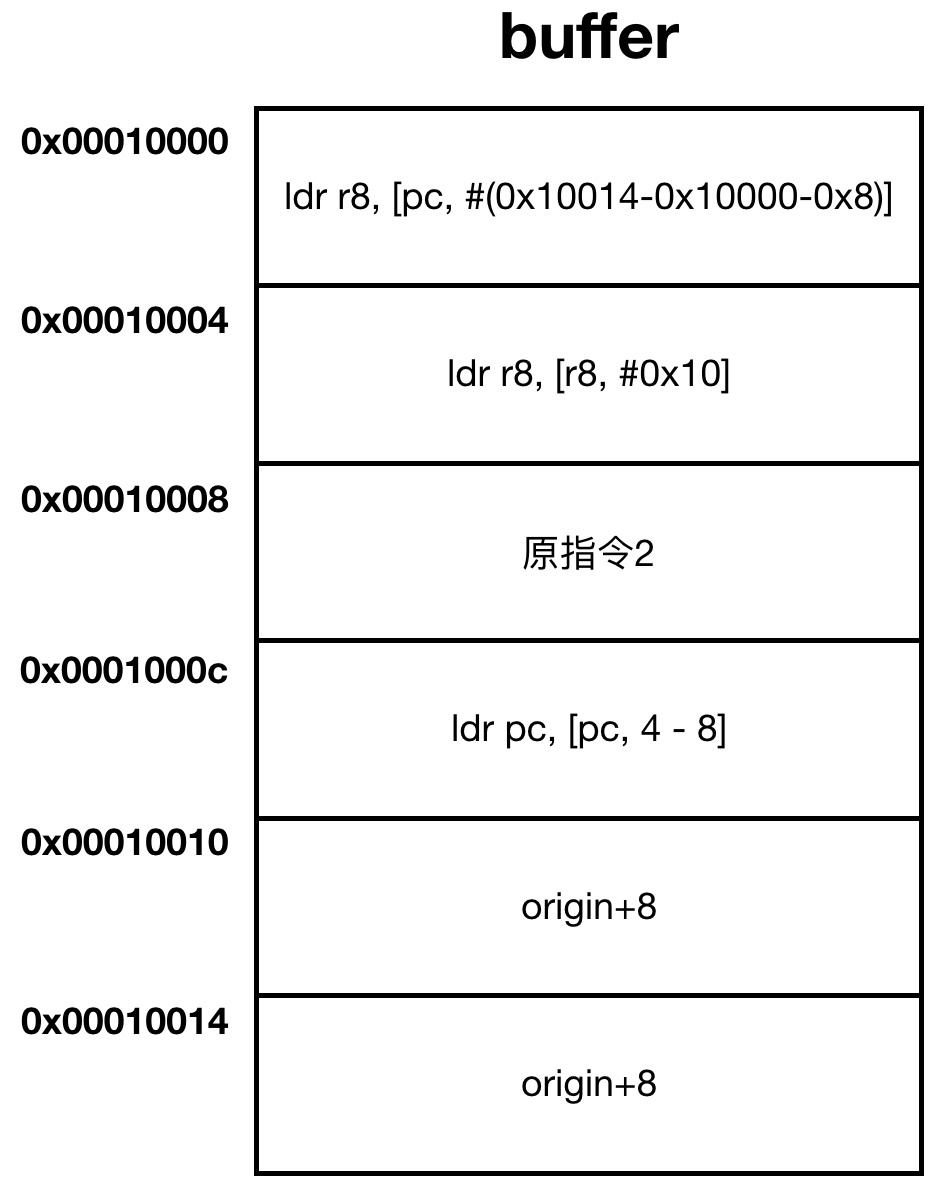
这里需要说明一下为什么会有一个 -8 的操作。查询 ARM 的手册,有如下几句话:

For an ARM instruction, the value read is the address of the instruction plus 8 bytes. Bits [1:0] of this value are always zero, because ARM instructions are always word-aligned

写入的话就是正常操作。如此这般就恢复了原来应该 r8 写入的值。

注意最后的地址为 origin + 8 而不是 origin 是因为原来的指令中读出的 pc 值是加了 8 的,这里也需要进行恢复。

指令为寄存器偏移并且 rd 与 rm 不相同

这种情况生成的代码与上面的类似,依旧拿一个指令举例:

1
ldr r8, [pc, r9] ; r8 = *(pc+r9)

在前提跟上一中情况相同的情况下,buffer 中的代码只是第二条指令变成了

1
ldr r8, [r8, r9]

指令为寄存器偏移并且 rd 与 rm 相同

依旧举一个例子:

1
ldr r8, [pc, r8]

前提依旧跟第一种情况一样,不过现在 buffer 的长度为 8 条指令。

原理也很简单,因为这里需要一个中间变量 r0,但是又不能破坏原来 r0 中的值,所以使用栈暂时将 r0 的值进行保存。

只能 hook 一次

源代码在开始不久就有一个这样的检查,是不是很眼熟?这就是 hook 后修改的内存指令。这里检查函数是否被 hook 过了,如果被 hook 过了,就将 hook 的原 replace 函数作为结果返回,方便我们队之前的 hook 函数进行 hook。

1
2
3
4
if (backup[0] == A$ldr_rd_$rn_im$(A$pc, A$pc, 4 - 8)) {
*result = reinterpret_cast<void *>(backup[1]);
return;
}

总结

自此,SubstrateHookFunctionARM 函数就分析完毕了,其实还有一个 SubstrateHookFunctionThumb 函数,负责用来 hook Thmub 指令模式下的函数。

经过了这一系列的操作,调用顺序这变成了下面的形式:

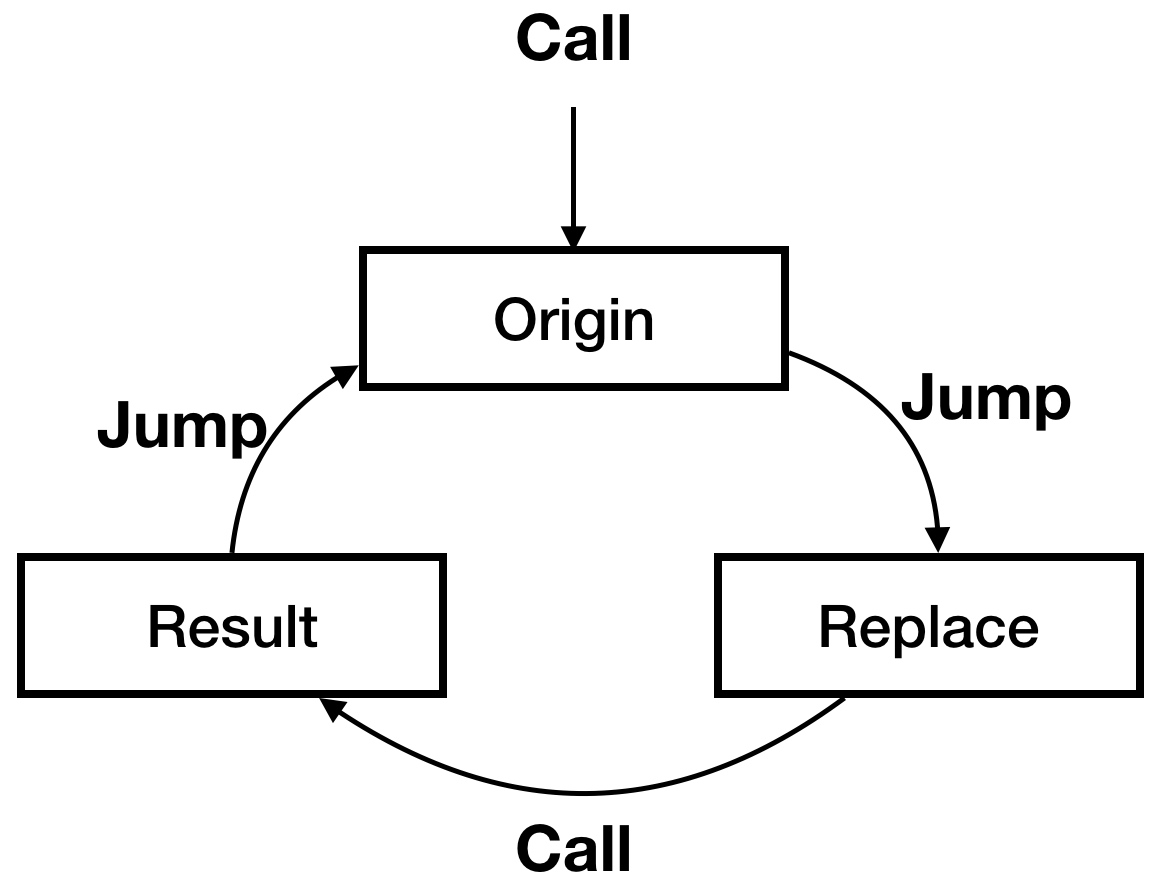
看上去似乎循环了,但是 Result 的跳转是到原函数的第3条指令,所以不会发生死循环。

MSHookMessage

在 arm 中,Cyida 提供了三个接口对 Objective-C 的方法进行 hook:

1
2
3
_extern void MSHookMessageEx(Class _class, SEL sel, IMP imp, IMP *result);
_extern IMP MSHookMessage(Class _class, SEL sel, IMP imp, const char *prefix);
_extern void _Z13MSHookMessageP10objc_classP13objc_selectorPFP11objc_objectS4_S2_zEPKc(Class _class, SEL sel, IMP imp, const char *prefix);

这三个函数都是对一个核心函数的包装,即:

1
static void MSHookMessageInternal(Class _class, SEL sel, IMP imp, IMP *result, const char *prefix);

几个参数分别是 目标类、目标方法,用于替换的方法实现、原函数的实现、原函数的重命名的前缀。

有了之前分析的经验,接下来的工作就会顺利很多,深吸一口气,开始吧!

HookInternal

首先代码先从继承链上拿到目标方法以及相关信息:

1
2
3
Method method(MSFindMethod(_class, sel));
// 获取方法的参数类型编码
const char *type(method_getTypeEncoding(method));

函数的实现如下:

1
2
3
4
5
6
7
8
9
10
11
12
13
14
15
16
17
18
19
static Method MSFindMethod(Class _class, SEL sel) {
// 查找继承链
for (; _class != nil; _class = class_getSuperclass(_class)) {
unsigned int size;
Method *methods(class_copyMethodList(_class, &size));
if (methods == NULL)
continue;
// 遍历所有方法进行查找
for (unsigned int j(0); j != size; ++j) {
Method method(methods[j]);
if (!sel_isEqual(method_getName(methods[j]), sel))
continue;
free(methods);
return method;
}
free(methods);
}
return nil;
}

接下来判断目标函数是不是继承过来的,这点可以先留着:

1
2
3
4
5
6
7
8
9
bool direct(false);
unsigned count;
Method *methods(class_copyMethodList(_class, &count));
for (unsigned i(0); i != count; ++i)
if (methods[i] == method) {
direct = true;
break;
}
free(methods);

接下来根据 direct 的值有一个分支:

1
2
3
4
IMP old(NULL);
if (!direct) {
// ... 这里省略很多代码
}

替换实现

然后就是核心的操作了,下面的注释基于假设方法是直属的假设进行分析的,利用了 Objective-C 的 runtime 技术:

1
2
3
4
5
6
7
8
9
10
11
12
13
14
15
16
17
18
19
20
21
22
23
24
if (old == NULL) // 这里获取到本类的实现
old = method_getImplementation(method);
if (result != NULL) // 将旧的实现返回
*result = old;
// 如果这里有替换的前缀,把前缀加到原方法名前
// 以新的名字将原来的实现作为新方法加入原类中
if (prefix != NULL) {
const char *name(sel_getName(sel));
size_t namelen(strlen(name));
size_t fixlen(strlen(prefix));
char *newname(reinterpret_cast<char *>(alloca(fixlen + namelen + 1)));
memcpy(newname, prefix, fixlen);
memcpy(newname + fixlen, name, namelen + 1);
if (!class_addMethod(_class, sel_registerName(newname), old, type))
MSLog(MSLogLevelError, "MS:Error: failed to rename [%s %s]", class_getName(_class), name);
}
// 这里假设方法是直属的,则直接将原方法的实现变更为新的实现
if (direct)
method_setImplementation(method, imp);
else
class_addMethod(_class, sel, imp, type);

将旧的实现返回以及使用新的名字将原来的函数放回方便调用,这是最基本的处理思路。
至此,主要的替换方式就已经明确,但是下面还将讨论一下细节。

!direct

接下来就是摘取看 !direct 分支究竟做了什么。这个前提是目标方法是继承而来的.
下面的代码只展示了 arm 部分的代码并且删除了一些 log 语句:

1
2
3
4
5
6
7
8
9
10
11
12
13
14
15
16
17
18
19
20
21
22
23
24
25
26
27
28
29
30
31
32
33
34
35
36
37
38
39
40
41
42
43
44
45
46
47
48
if (!direct) {
#if defined(__arm__)
// 熟悉的写法,这里表示代码长度为 11 个指令
size_t length(11 * sizeof(uint32_t));
#elif defined(__i386__)
// ...
#elif defined(__x86_64__)
// ...
#endif
// 分配内存
uint32_t *buffer(reinterpret_cast<uint32_t *>(mmap(
NULL, length, PROT_READ | PROT_WRITE, MAP_ANON | MAP_PRIVATE, -1, 0
)));
if (buffer == MAP_FAILED)
MSLog(MSLogLevelError, "MS:Error:mmap() = %d", errno);
else if (false) fail:
munmap(buffer, length);
else {
Class super(class_getSuperclass(_class));
#if defined(__arm__)
// 熟悉而又陌生的味道
buffer[ 0] = A$stmdb_sp$_$rs$((1 << A$r0) | (1 << A$r1) | (1 << A$r2) | (1 << A$r3) | (1 << A$lr));
buffer[ 1] = A$ldr_rd_$rn_im$(A$r0, A$pc, ( 8 - 1 - 2) * 4);
buffer[ 2] = A$ldr_rd_$rn_im$(A$r1, A$pc, ( 9 - 2 - 2) * 4);
buffer[ 3] = A$ldr_rd_$rn_im$(A$lr, A$pc, (10 - 3 - 2) * 4);
buffer[ 4] = A$blx_rm(A$lr);
buffer[ 5] = A$str_rd_$rn_im$(A$r0, A$sp, -4);
buffer[ 6] = A$ldmia_sp$_$rs$((1 << A$r0) | (1 << A$r1) | (1 << A$r2) | (1 << A$r3) | (1 << A$lr));
buffer[ 7] = A$ldr_rd_$rn_im$(A$pc, A$sp, -4 - (5 * 4));
buffer[ 8] = reinterpret_cast<uint32_t>(super);
buffer[ 9] = reinterpret_cast<uint32_t>(sel);
buffer[10] = reinterpret_cast<uint32_t>(&class_getMethodImplementation);
#elif defined(__i386__)
// ...
#elif defined(__x86_64__)
// ...
#endif
if (mprotect(buffer, length, PROT_READ | PROT_EXEC) == -1) {
MSLog(MSLogLevelError, "MS:Error:mprotect():%d", errno);
goto fail;
}
old = reinterpret_cast<IMP>(buffer);
}

依旧对照根据之前的宏,可以将 buffer 中的内容翻译成如下的汇编代码:

1
2
3
4
5
6
7
8
9
10
11
stmdb sp! {r0~r3, lr} ; 将 r0~r3, lr 入栈
ldr r0, [pc, #(8-1)*4-8] ; 第一个参数 super
ldr r1, [pc, #(9-2)*4-8] ; 第二个参数 sel
ldr lr, [pc, #(10-3)*4-8] ; 获取 class_getMethodImplementation 的地址
blx lr ; 跳转到 class_getMethodImplementation 执行
str r0, [sp, #-0x4] ; 将结果存入 sp-4 中
ldmia sp!, {r0~r3, lr} ; 将 r0~r3, lr 出栈
ldr pc, [sp, #-0x18] ; 设置 pc 为获取到的地址,因为出栈了 5 个寄存器,占了 0x14 个字节空间
; addr of super
; addr of sel
; addr of class_getMethodImplementation

这段代码是获取函数的父类的旧实现,然后跳转执行。此时 old 的实现变成了 buffer 这段代码。

在非直属方法的情况下,最后给本类添加新的同名方法,原函数的调用则返回了处理过后的 buffer。

1
2
3
4
if (direct)
method_setImplementation(method, imp);
else // 现在走这一段,给同名方法添加新的实现,因为本类没有。
class_addMethod(_class, sel, imp, type);

为什么要做这个处理,参考 官方说明页面 提到:

However, while these APIs function quite well when there are only a small number of people making modifications, they fail to satisfy more complex use cases; in particular, there are ordering problems if multiple people attempt to hook the same message at different points in an inheritance hierarchy.

Finally, it is important that classes that are being instrumented are not “initialized” as they are being modified (which would both change the ordering of the target program, as well as make it impossible to hook the initialization sequence); over time, the way Objective-C runtime APIs implement this has changed.

Substrate solves all of these problems by providing a replacement API that takes all of these issues into account, always making certain that the classes are not initialized and that the right “next implementation” is used while walking back up an inheritance hierarchy.

这么做的目的是为了让继承链上的函数能得到正确的 next implementation

情景分析:

考虑如下的继承关系 A 类,B 类,C 类,继承关系为 C -> B -> A,现在 A 类有一个方法 method,并且 B、C 类都没有实现,即从 A 类继承的方法。

所有 hook 后的替换函数都调用了原函数以保证功能正确。

假设 C 先 hook,B 后 hook。

如果没有如此上面的处理,直接将父类的实现地址放到内存中,则会产生如下的调用链:

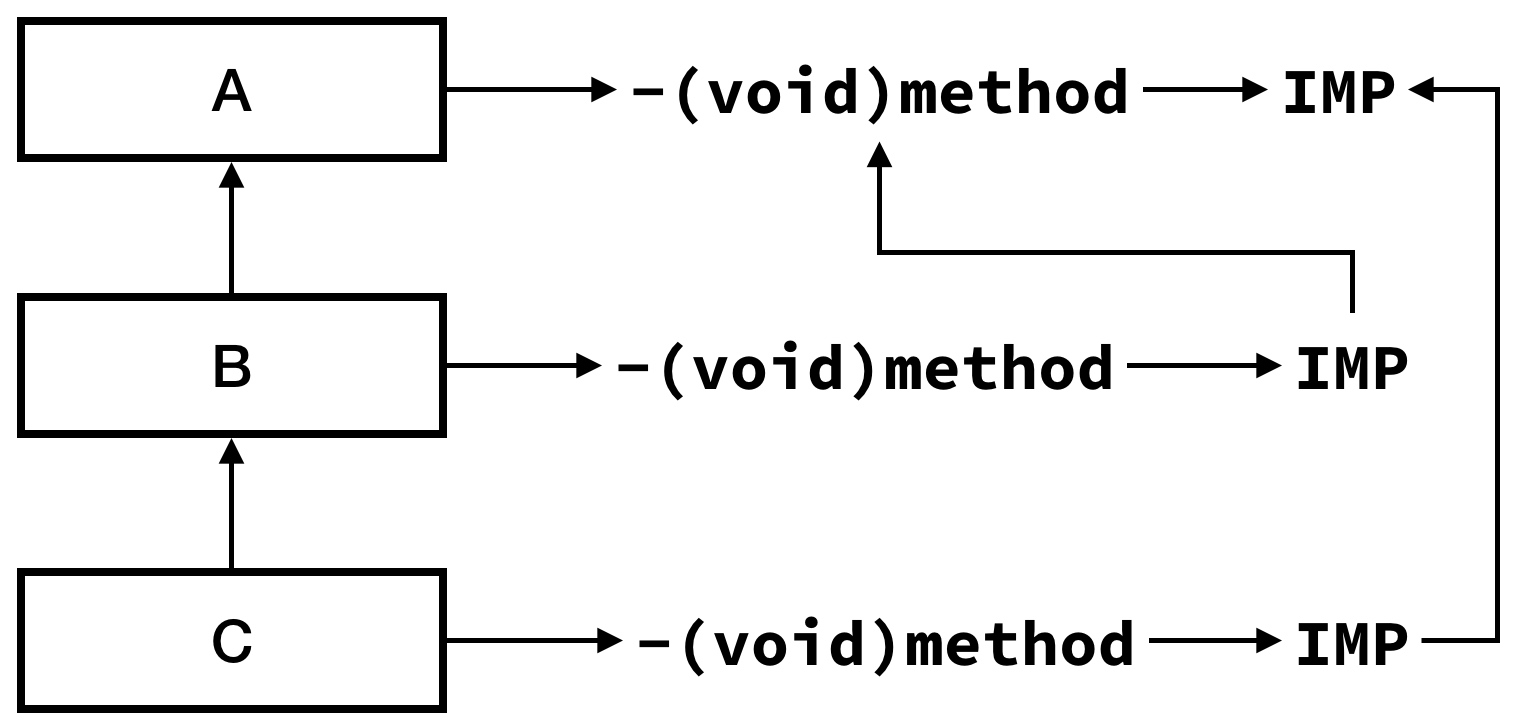
因为 B 的 method 后与 C 添加,所以在调用 [c method] 时不会运行 B 的自定义函数。

如果做了上述的处理,就可以动态的查询父类的实现,就能生成如下如下的调用链:

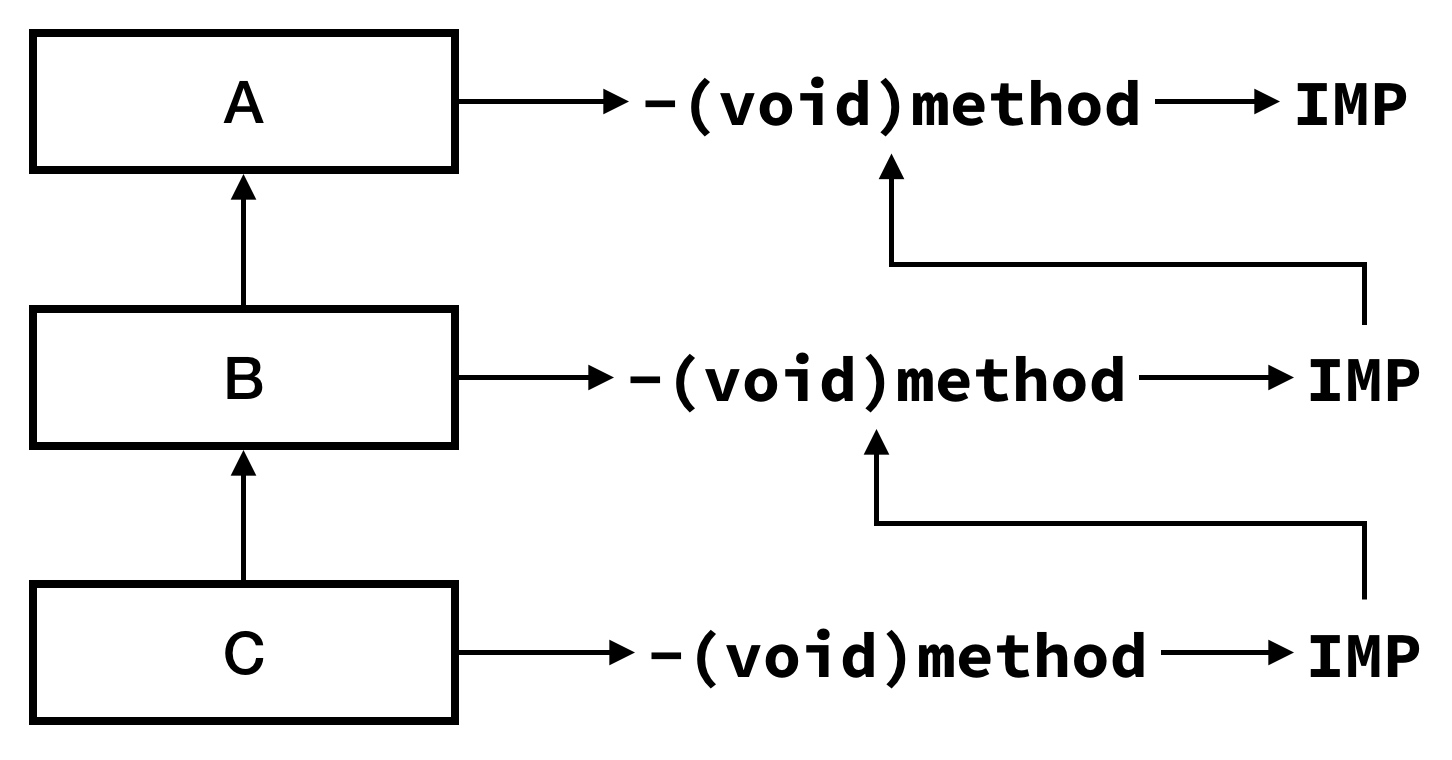
这样在调用 [c method] 时,B 的函数也能正确的被调用。使得调用的顺序与 hook 的顺序无关。

总结

OC 的 runtime 机制让 OC 方法的 hook 实现简单了很多,利用方法实现的替换就可以做到对方法的 hook。这里的精髓则是在 hook 时,对调用链进行的处理。

Summary

Cydia 提供了三个接口来进行 hook 工作,但是开放的只有后两个。这里充分体现了对函数 hook 的思想:

在程序入口做跳转,保存原来的函数地址。

Cydia 的实现,大都是修改了对应函数的部分内存,利用 mach 的一些系统调用来注入自己的代码。对 ARM 代码直接编码进行注入的方式也是比较精巧的。让人受益匪浅。

可惜的是这是一个老版本的源码,都是建立在 32 位的 ARM 汇编下做的处理。因为高版本的 Cydia 已经闭源,所以只能通过逆向的方式对其 hook 原理做探索了。但是老基本的思想应该是不变的。

只能说,是真的大牛,学到了。

参考资料